applicationContext.xml
头文件
<?xml version="1.0" encoding="UTF-8"?>
<beans xmlns="http://www.springframework.org/schema/beans"
       xmlns:xsi="http://www.w3.org/2001/XMLSchema-instance"
       xsi:schemaLocation="http://www.springframework.org/schema/beans
   http://www.springframework.org/schema/beans/spring-beans-3.0.xsd">
</beans>
构造方式
- 一般一个类他会自带一个默认的无参构造方法,如果你在其中写入了有参构造,在没有重新写入无参构造的情况下,该无餐构造方法就不存在了
- 在使用spring框架时,在使用一个类的时候,spring容器会自动对该类进行实例化,但是该类必须时无参构造的,相当于spring的默认设置
- 如果在使用spring框架时,实体类的初始化方法是有参构造,那么需要在配置文件中进行配置(即.xml文件)之后spring容器才能对该类进行实例化
- 在读取配置文件时,对象就已经进行初始化了
无参构造
在类有有参构造方法时,需要显示写出无参构造方法
<bean id="user" class="com.fsl.pojo.User">
    <property name="name" value="fsl"/>
</bean>
有参构造
<!--  直接通过参数名进行赋值  -->
<bean id="user" class="com.fsl.pojo.User">
    <constructor-arg name="name" value="fsl"/>
</bean>

<!-- 通过下标进行赋值 -->
<bean id="user" class="com.fsl.pojo.User">
    <constructor-arg index="0" value="fsl"/>
</bean>

<!-- 通过属性类型进行赋值 -->
<bean id="user" class="com.fsl.pojo.User">
    <constructor-arg type="java.lang.String" value="fsl"/>
</bean>
Spring配置
alias
使用别名之后,可以将别名当做原名使用
<alias name="user" alias="user2"/>import
将多个xml配置文件导入为1个文件
<import resource="$FilePath"/>bean的配置
<!--
       id: bean的唯一标识符
       class: 类的全限定名
       name: 相当于别名,可以设置多个,通过空格,逗号,分号进行分割分割
 -->
<bean id="user" class="com.fsl.pojo.User" name="user2 u1,u2;u3">
</bean>
Bean多种数据类型的构造方式
类
public class Student {
    private String name;
    private Address address;
    private String[] books;
    private List<String> hobby;
    private Map<String,String> card;
    private Set<String> games;
    private String wife;
    private Properties info;
}


public class Address {
    private String address;
}
Bean配置
<bean id="address" class="com.fsl.pojo.Address">
    <property name="address" value="wczy"/>
</bean>
<bean id="student" class="com.fsl.pojo.Student">
    <property name="name" value="fsl"/>
    <!-- Bean注入-->
    <property name="address" ref="address"/>
    <!-- 数组注入 -->
    <property name="books">
        <array>
            <value>三国</value>
            <value>西游</value>
            <value>红楼</value>
            <value>水浒</value>
        </array>
    </property>
    <!--  List -->
    <property name="hobby">
        <list>
            <value>玩游戏</value>
            <value>听歌</value>
            <value>看书</value>
            <value>运动</value>
        </list>
    </property>
    <!-- Map -->
    <property name="card">
        <map>
            <entry key="电话" value="11123123"/>
            <entry key="身份证" value="12312312312312"/>
        </map>
    </property>
    <!-- properties -->
    <property name="info">
        <props>
            <prop key="url">www.baidu,com</prop>
            <prop key="password">123123</prop>
        </props>
    </property>
    <!-- Set -->
    <property name="games">
        <set>
            <value>LOL</value>
            <value>COC</value>
        </set>
    </property>
    <!-- NULL -->
    <property name="wife">
        <null/>
    </property>
</bean>
</beans>
p名称空间
p的意思就是使用property进行注入值,所以需要无参构造函数与set方法
xml文件
<?xml version="1.0" encoding="UTF-8"?>
<beans xmlns="http://www.springframework.org/schema/beans"
       xmlns:xsi="http://www.w3.org/2001/XMLSchema-instance"
       xmlns:p="http://www.springframework.org/schema/p"    //就是添加这个
       xsi:schemaLocation="http://www.springframework.org/schema/beans
   http://www.springframework.org/schema/beans/spring-beans-3.0.xsd">
</beans>
示例
<?xml version="1.0" encoding="UTF-8"?>
<beans xmlns="http://www.springframework.org/schema/beans"
       xmlns:xsi="http://www.w3.org/2001/XMLSchema-instance"
       xmlns:p="http://www.springframework.org/schema/p"
       xmlns:c="http://www.springframework.org/schema/c"
       xsi:schemaLocation="http://www.springframework.org/schema/beans
   http://www.springframework.org/schema/beans/spring-beans-3.0.xsd">

    <!-- 在使用p命令空间是,类中必须要有无参构造方法和set方法 -->
    <!-- 后面带一个ref的就是引用的其他的bean -->
    <bean id="user" class="com.fsl.pojo.User" p:name="fsl" p:id="20221111" p:pwd="fasfadsd" p:address-ref="address"/>
</beans>
c名称空间
c的意思就是使用constructor-arg进行构造,所以需要用到有参构造函数
xml文件
<?xml version="1.0" encoding="UTF-8"?>
<beans xmlns="http://www.springframework.org/schema/beans"
       xmlns:xsi="http://www.w3.org/2001/XMLSchema-instance"
       xmlns:c="http://www.springframework.org/schema/c"    //就是添加这个
       xsi:schemaLocation="http://www.springframework.org/schema/beans
   http://www.springframework.org/schema/beans/spring-beans-3.0.xsd">
</beans>
示例
<bean id="user2" class="com.fsl.pojo.User" c:name="asdad" c:id="22222222" c:pwd="asdasdasd" c:address-ref="address"/>在写这个示例时,出现使用address-ref时,报错
Unsatisfied dependency expressed through constructor parameter 0,在官网上看到,出现一些问题可以尝试退回使用参数索引模式.
<bean id="user3" class="com.fsl.pojo.User" c:_0="asdasd" c:_1="11111" c:_2="asdasdasda" c:_3-ref="address"/>
_0代表索引为0的参数,也就是的第一个参数
_1代表索引为1的参数,也就是的第二个参数以此类推
_3-ref:代表索引为3的参数的引用,也就是第三个参数的引用
Bean 作用域
| Scope | Description |
|---|---|
| singleton | (Default) Scopes a single bean definition to a single object instance for each Spring IoC container. |
| prototype | Scopes a single bean definition to any number of object instances. |
| request | Scopes a single bean definition to the lifecycle of a single HTTP request. That is, each HTTP request has its own instance of a bean created off the back of a single bean definition. Only valid in the context of a web-aware Spring ApplicationContext. |
| session | Scopes a single bean definition to the lifecycle of an HTTP Session. Only valid in the context of a web-aware Spring ApplicationContext. |
| application | Scopes a single bean definition to the lifecycle of a ServletContext. Only valid in the context of a web-aware Spring ApplicationContext. |
| websocket | Scopes a single bean definition to the lifecycle of a WebSocket. Only valid in the context of a web-aware Spring ApplicationContext. |
singleton
<bean id="user" class="com.fsl.pojo.User" p:name="fsl" p:id="20221111" p:pwd="fasfadsd" p:address-ref="address" scope="singleton"/>这也是Spring默认的scope,表示Spring容器只创建一个bean的实例,Spring在创建第一次后会缓存起来,之后不再创建,就是设计模式中的单例模式。
prototype
<bean id="user" class="com.fsl.pojo.User" p:name="fsl" p:id="20221111" p:pwd="fasfadsd" p:address-ref="address" scope="prototype"/>代表线程每次调用这个bean都新创建一个实例。
其它的几种只能在web中使用
自动装配
spring会在应用上下文中为某个bean寻找其依赖的bean。
装配方式
- 在xml中显式配置;
- 在java中显式配置;
- 隐式的bean发现机制和自动装配。
ByName
<bean id="people" class="com.fsl.pojo.People" autowire="byName"/>当一个bean节点带有 autowire byName的属性时。
将查找其类中所有的set方法名,例如setCat,获得将set去掉并且首字母小写的字符串,即cat;
去spring容器中寻找是否有此字符串名称id的对象。
如果有,就取出注入;如果没有,就报空指针异常。
ByType
<bean id="people" class="com.fsl.pojo.People" autowire="byType"/>使用ByType,会在容器上下文中寻找与自己对象属性类型相同的Bean
使用autowire byType首先需要保证:同一类型的对象,在spring容器中唯一。如果不唯一,会报不唯一的异常。
注解进行自动装配
预先准备
<?xml version="1.0" encoding="UTF-8"?>
<beans xmlns="http://www.springframework.org/schema/beans"
    xmlns:xsi="http://www.w3.org/2001/XMLSchema-instance"
    xmlns:context="http://www.springframework.org/schema/context"
    xsi:schemaLocation="http://www.springframework.org/schema/beans
        https://www.springframework.org/schema/beans/spring-beans.xsd
        http://www.springframework.org/schema/context
        https://www.springframework.org/schema/context/spring-context.xsd">

    <context:annotation-config/>  //开启配置

</beans>
主要是添加了一下内容
xmlns:context="http://www.springframework.org/schema/context"
        http://www.springframework.org/schema/context
        https://www.springframework.org/schema/context/spring-context.xsd
@Autowired
在类的属性或者set方法上添加上这个注解,它会自动进行装配
@Autowired(required = false)在使用Autowired时,如果bean不存在,就会报错,要是想要不报错,就加上
(required = false)
@Qualifier
配合Autowired进行使用,指定使用那个Ioc容器,如果不使用,默认自动进行探测,value的值为唯一的bean对象的ID
@Autowired
@Qualifier(value = "dog")
@Resource
可以通过name指定那个bean
@Resource(name = "cat")
private Cat cat;
可能无法使用Resource,需要进行maven导包
xml<dependency> <groupId>javax.annotation</groupId> <artifactId>javax.annotation-api</artifactId> <version>1.3.2</version> </dependency>
@Nullable
使用这个注解表示,这个变量可以为Null
Resource与Autowired区别
- 都是用来进行自动装载
- @Autowired通过byType实现,而且这个要求这个对象必须存在
- @Resource默认通过byName实现,如果找不到,则通过byType方式实现,两种都找不到就会报错
使用注解开发
@Component
@Component("cat")
//相当于 <bean id="cat" class="当前注解的类"/>
在类名上加上这个注解
@Value
指定name中bean中的值
@Value(value = "fsl")
private String name;
// <property name="name" value="fsl">一般用于普通类型,复杂的类需要用到Qualifier
@Scope
@Scope("prototype")
//<bean id="id值" class="当前注解的类" scope="prototype"/>
相当于在
<bean>标签中添加scope属性singleton/prototype
@Component三个衍生注解
为了更好的进行分层,Spring可以使用其它三个注解,功能一样,目前使用哪一个功能都一样。
- @Controller:web层
- @Service:service层
- @Repository:dao层
全Java配置Bean
预先配置
想要使用全Java配置Spring Bean,就需要用到
@Configuration注解,将其放在配置类上
@Configurationcan be considered the equivalent of XML's<beans/>element.
@Configuration
public class MyConfig {
}
@Configuration+@ComponentScan+@Component
ComponentScan
使用这个注解搭配
@Component使用可以将,这些内容引入配置中想当于:
<context:component-scan base-package="com.fsl.pojo" />
@Configuration
@ComponentScan("com.fsl.pojo") //扫描com.fsl.pojo中的类,进行配置Component的类,进行加入配置
public class MyConfig {
}
Component的配置就是上面写的那些
@Bean
使用
@Bean标签的话,可以实现不去类里面进行配置,直接在configuration类中进行配置
@Configuration
public class MyConfig {
    @Bean(name = "fsl")
    public People people() {
        return new People(dog(),cat());   //使用时需要注意,要在People类中添加对应的方法
    }

    @Bean
    public Dog dog() {
        return new Dog();
    }

    @Bean
    public Cat cat() {
        return new Cat();
    }
}
@Bean里面可以填入name的值,相当于之前的xml文件的id的值,要是这个类依赖其它的类,可以像People类这样使用,前提是需要要将其它类的也写进配置类里面,而且,People类需要有对应的构造函数
使用全JavaConfig,需要使用
AnnotationConfigApplicationContext来获取ApplicationContext
import com.decade.config.MyConfig2;
import com.decade.pojo.User2;
import org.springframework.context.ApplicationContext;
import org.springframework.context.annotation.AnnotationConfigApplicationContext;

public class Client2 {
    public static void main(String[] args) {
        ApplicationContext context = new AnnotationConfigApplicationContext(MyConfig2.class);
        User2 user = context.getBean("getUser", User2.class);
        System.out.println(user.getName());
    }
}
AOP
表达式
javaexecution (* com.sample.service.impl.*.*(..))1、execution():表达式主体。 2、第一个*号:表示返回类型,*号表示所有的类型。 3、包名:表示需要拦截的包名,后面的两个句点分别表示当前包和当前包的所有子包,com.sample.service.impl包、子孙包下所有类的方法。 4、第二个*号:表示类名,*号表示所有的类。 5、*(..) :第三个星号表示方法名,*号表示所有的方法,后面括弧里面表示方法的参数,两个句点表示任何参数。
AOP的概念
Aspect(切面): Aspect 声明类似于 Java 中的类声明,在 Aspect 中会包含着一些 Pointcut 以及相应的 Advice。 Joint point(连接点):表示在程序中明确定义的点,典型的包括方法调用,对类成员的访问以及异常处理程序块的执行等等,它自身还可以嵌套其它 joint point。 Pointcut(切点):表示一组 joint point,这些 joint point 或是通过逻辑关系组合起来,或是通过通配、正则表达式等方式集中起来,它定义了相应的 Advice 将要发生的地方。 Advice(增强):Advice 定义了在 Pointcut 里面定义的程序点具体要做的操作,它通过 before、after 和 around 来区别是在每个 joint point 之前、之后还是代替执行的代码。 Target(目标对象):织入 Advice 的目标对象.。 Weaving(织入):将 Aspect 和其他对象连接起来, 并创建 Adviced object 的过程
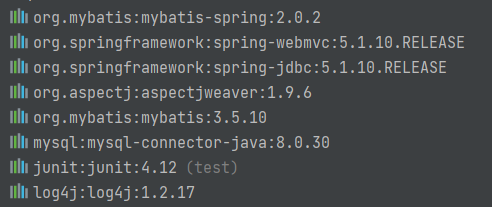
需要导入的jar包
<dependency>
   <groupId>org.aspectj</groupId>
   <artifactId>aspectjweaver</artifactId>
   <version>1.9.4</version>
</dependency>
xml文件的约束
<?xml version="1.0" encoding="UTF-8"?>
<beans xmlns="http://www.springframework.org/schema/beans"
      xmlns:xsi="http://www.w3.org/2001/XMLSchema-instance"
      xmlns:aop="http://www.springframework.org/schema/aop"
      xsi:schemaLocation="http://www.springframework.org/schema/beans
       http://www.springframework.org/schema/beans/spring-beans.xsd
       http://www.springframework.org/schema/aop
       http://www.springframework.org/schema/aop/spring-aop.xsd">
</beans>
三种配置方法
通过 Spring API 实现
通过Spring API实现的话,需要去实现对应的Spring的接口
定义一个类,用来实现指定的AOP 接口
可以用来实现的接口:
- AfterReturningAdvice
- MethodBeforeAdvice
public class afterReturnLog implements AfterReturningAdvice {

    @Override
    //第一个参数是返回的对象,第二个是执行的方法,第三个是实参列表,第四个是执行方法的类
    public void afterReturning(Object returnResult, Method method, Object[] args, Object target) throws Throwable {
        System.out.println(target.getClass().getName()+" 的 "+method.getName()+" 方法 "+"返回值为: "+returnResult);
    }
}


public class beforeLog implements MethodBeforeAdvice {
    @Override
    //第一个参数为要执行的方法,第二个是实参列表,第三个是执行方法的类
    public void before(Method method, Object[] objects, Object o) throws Throwable {
        System.out.println(o.getClass().getName()+"的"+method.getName()+"被执行");
    }
}
里面的
printf的内容可以自定义,通过给出的方法进行反射得出各种信息
在beans文件中进行注册,并进行aop的配置
<?xml version="1.0" encoding="UTF-8"?>
<beans xmlns="http://www.springframework.org/schema/beans"
       xmlns:xsi="http://www.w3.org/2001/XMLSchema-instance"
       xmlns:context="http://www.springframework.org/schema/context"
       xmlns:aop="http://www.springframework.org/schema/aop"
       xsi:schemaLocation="http://www.springframework.org/schema/beans
     https://www.springframework.org/schema/beans/spring-beans.xsd
     http://www.springframework.org/schema/context
     https://www.springframework.org/schema/context/spring-context.xsd
     http://www.springframework.org/schema/aop
     https://www.springframework.org/schema/aop/spring-aop.xsd">

    <bean id="userService" class="com.fsl.pojo.UserServiceImpl"/>
    <bean id="beforeLog" class="com.fsl.log.beforeLog"/>
    <bean id="afterReturnLog" class="com.fsl.log.afterReturnLog"/>

    <aop:config >
        <aop:pointcut id="userServicePointCut" expression="execution(* com.fsl.pojo.*.*(..))"/>
        <!-- 这里的advice-ref需要在bean中注册才可以使用 -->
        <aop:advisor advice-ref="beforeLog" pointcut-ref="userServicePointCut"/>
        <aop:advisor advice-ref="afterReturnLog" pointcut-ref="userServicePointCut"/>
    </aop:config>
</beans>pointcut:使用execution表达式,指定切入点
advisor:用于绑定advice与pointcut
进行测试
@Test
public void myTest(){
    ApplicationContext applicationContext = new ClassPathXmlApplicationContext("applicationContext.xml");
    UserService userService = applicationContext.getBean("userService", UserService.class);
    userService.insert();
}
注意getBean这里需要使用接口,而不能使用具体的类
自定义类来实现Aop
自定义一个类
package com.fsl.log;

public class custom {
    public void before(){
        System.out.println("方法执行之前");
    }
    public void after(){
        System.out.println("方法执行之后");
    }
}
进行beans文件与aop的配置
<?xml version="1.0" encoding="UTF-8"?>
<beans xmlns="http://www.springframework.org/schema/beans"
       xmlns:xsi="http://www.w3.org/2001/XMLSchema-instance"
       xmlns:context="http://www.springframework.org/schema/context"
       xmlns:aop="http://www.springframework.org/schema/aop"
       xsi:schemaLocation="http://www.springframework.org/schema/beans
     https://www.springframework.org/schema/beans/spring-beans.xsd
     http://www.springframework.org/schema/context
     https://www.springframework.org/schema/context/spring-context.xsd
     http://www.springframework.org/schema/aop
     https://www.springframework.org/schema/aop/spring-aop.xsd">


    <bean id="userService" class="com.fsl.pojo.UserServiceImpl"/>
    <bean id="custom" class="com.fsl.log.custom"/>
    <aop:config>
        <aop:pointcut id="userServicePointCut" expression="execution(* com.fsl.pojo.*.*(..))"/>
        <!-- 切面的定义
            ref: 指定上面注册的类
        -->
        <aop:aspect ref="custom">
            <!-- 也可以在aspect里面进行声明pointcut,在id相同的情况下,优先使用aspect里面的pointcut -->
            <aop:pointcut id="userServicePointCut" expression="execution(* com.fsl.pojo.UserServiceImpl.*(..))"/>
            <!-- 这里的method就是在ref中创建的方法,pointcut-ref 指定的是上面声明的pointcut -->
            <aop:before method="before" pointcut-ref="userServicePointCut"/>
            <aop:after method="after" pointcut-ref="userServicePointCut"/>
        </aop:aspect>
    </aop:config>
</beans>
使用注解实现
在applicationContext.xml中开启aop的注解支持
<aop:aspectj-autoproxy/>编写对应的类并在其上加上注解
@Aspect //这里相当于在xml的aop:config中指定ref为这个类
public class Annotation {
    //相当于之前的aspect的方法与pointcut的绑定,只是这里的pointcut没有办法引用
    @Before("execution(* com.fsl.pojo.UserServiceImpl.*(..))")
    public void before(){
        System.out.println("方法执行之前");
    }
    @After("execution(* com.fsl.pojo.UserServiceImpl.*(..))")
    public void after(){
        System.out.println("方法执行之后");
    }
    @Around("execution(* com.fsl.pojo.UserServiceImpl.*(..))")
    //around必须要添加ProceedingJoinPoint,并且需要让他进行执行,也就是joinPoint.proceed(),不然这个方法无法进行执行
    public void around(ProceedingJoinPoint,并且需要让他进行执行,也就是 joinPoint) throws Throwable {
        System.out.println("环绕前");
        //jointPoint指的是我们匹配到的方法,joinPoint.proceed()指的是执行这个方法,可以在其之前或者之后添加一些操作
        Object procced = joinPoint.proceed();
        System.out.println("环绕后");
    }
}
整合Mybatis
之前是通过对象创建
Sqlsession,在Spring中需要全部使用bean实现之前是通过
SqlSessionFactoryBuilder->sqlSessionFactory-->SqlSession,而SqlSessionFactoryBuilder必要的一个属性就是数据库的相关的信息现在是通过
dataSource-->SqlSessionFactoryBean-->SqlSessionTemplate
SqlSessionTemplate是SqlSession的一个实现
SqlSessionTemplate
beans.xml
<?xml version="1.0" encoding="UTF-8"?>
<beans xmlns="http://www.springframework.org/schema/beans"
xmlns:xsi="http://www.w3.org/2001/XMLSchema-instance" xmlns:util="http://www.springframework.org/schema/util"
xmlns:context="http://www.springframework.org/schema/context"
xsi:schemaLocation="http://www.springframework.org/schema/beans
http://www.springframework.org/schema/beans/spring-beans-3.0.xsd
http://www.springframework.org/schema/util
https://www.springframework.org/schema/util/spring-util.xsd
http://www.springframework.org/schema/context
https://www.springframework.org/schema/context/spring-context.xsd">
<!--
使用这个导入properties配置文件需要导入
xmlns:context="http://www.springframework.org/schema/context"
http://www.springframework.org/schema/context
https://www.springframework.org/schema/context/spring-context.xsd
在引入properties文件时,需要加入system-properties-mode="NEVER",不然在引用username时,会引入系统的username的变量
加载properties文件博客: https://blog.csdn.net/qq_57907966/article/details/125831680
-->
<context:property-placeholder location="classpath:db.properties" system-properties-mode="NEVER"/>
<bean id="dataSource" class="org.springframework.jdbc.datasource.DriverManagerDataSource">
<property name="driverClassName" value="${driver}"/>
<property name="url" value="${url}"/>
<property name="username" value="${username}"/>
<property name="password" value="${password}"/>
</bean>
<bean id="sqlSessionFactory" class="org.mybatis.spring.SqlSessionFactoryBean" >
<!--这个是指定mybatis配置文件的位置,其实大多数的配置文件都可以在这里进行配置,也可以在配置文件里面进行配置-->
<property name="configLocation" value="mybatis-config.xml"/>
<!--指定mapper文件的位置-->
<property name="mapperLocations" value="mapper/*.xml"/>
<property name="dataSource" ref="dataSource"/>
</bean>
<!--SqlSessionTemplate没有Set方法,所以不能使用有参构造,只能使用constructor-arg-->
<bean id="sqlSession" class="org.mybatis.spring.SqlSessionTemplate">
<constructor-arg index="0" ref="sqlSessionFactory"/>
</bean>
<!--通过一个类来实现StudentMapper,然后将这个类注册到Spring中,使用Spring接管,在这个类中完成SqlSession的创建和一些相关的处理-->
<bean id="studentMapper" class="com.fsl.dao.StudentMapperImpl">
<property name="sqlSession" ref="sqlSession"/>
</bean>
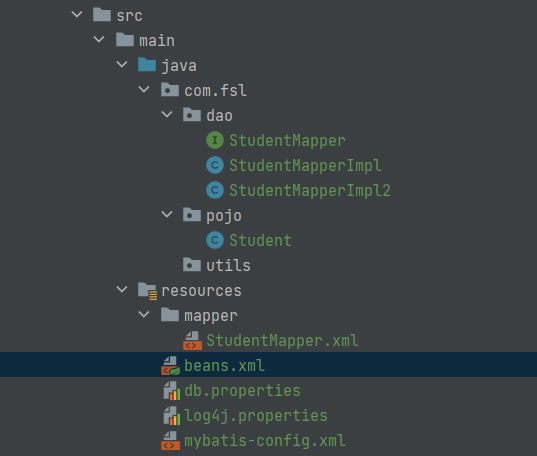
</beans>StudentMapperImpl.java
public class StudentMapperImpl implements StudentMapper{


    public SqlSession sqlSession;
    // 这个实现类必须要有sqlSession的set方法,因为sqlSession需要在Spring中去注入
    public void setSqlSession(SqlSessionTemplate sqlSession) {
        this.sqlSession = sqlSession;
    }

    @Override
    //直接在这里调用类里面的sqlSession去调用getMapper获取对应的接口
    public List<Student> getAllStudent() {
        StudentMapper mapper = sqlSession.getMapper(StudentMapper.class);
        return mapper.getAllStudent();
    }
}
测试代码
@Test
public void test(){
    ApplicationContext context = new ClassPathXmlApplicationContext("beans.xml");
    StudentMapper studentMapper = context.getBean("studentMapper", StudentMapper.class);
    for (Student student : studentMapper.getAllStudent()) {
        System.out.println(student);
    }
}
SqlSessionDaoSupport
上面的那种方法还需要从
SqlSessionFactory中获取SqlSessionTemplate,使用SqlSessionDaoSupport,就不需要使用SqlSessionTemplate,它可以直接获取
studentMapperImpl
直接继承
SqlSessionDaoSupport,可以直接调用getSqlSession方法获取,只需要传入一个sqlSessionFactory,就可以了
public class StudentMapperImpl2 extends SqlSessionDaoSupport implements StudentMapper{
    @Override
    public List<Student> getAllStudent() {
        StudentMapper mapper = getSqlSession().getMapper(StudentMapper.class);
        return mapper.getAllStudent();
    }
}
beans.xml
<?xml version="1.0" encoding="UTF-8"?>
<beans xmlns="http://www.springframework.org/schema/beans"
       xmlns:xsi="http://www.w3.org/2001/XMLSchema-instance" xmlns:util="http://www.springframework.org/schema/util"
       xmlns:context="http://www.springframework.org/schema/context"
       xsi:schemaLocation="http://www.springframework.org/schema/beans
       http://www.springframework.org/schema/beans/spring-beans-3.0.xsd
       http://www.springframework.org/schema/util
       https://www.springframework.org/schema/util/spring-util.xsd
        http://www.springframework.org/schema/context
        https://www.springframework.org/schema/context/spring-context.xsd">
    <!--
    使用这个导入properties配置文件需要导入
    xmlns:context="http://www.springframework.org/schema/context"
        http://www.springframework.org/schema/context
        https://www.springframework.org/schema/context/spring-context.xsd

    在引入properties文件时,需要加入system-properties-mode="NEVER",不然在引用username时,会引入系统的username的变量
    加载properties文件博客: https://blog.csdn.net/qq_57907966/article/details/125831680
    -->
    <context:property-placeholder  location="classpath:db.properties" system-properties-mode="NEVER"/>
    <bean id="dataSource" class="org.springframework.jdbc.datasource.DriverManagerDataSource">
        <property name="driverClassName" value="${driver}"/>
        <property name="url" value="${url}"/>
        <property name="username" value="${username}"/>
        <property name="password" value="${password}"/>
    </bean>
    <bean id="sqlSessionFactory" class="org.mybatis.spring.SqlSessionFactoryBean" >
        <!--这个是指定mybatis配置文件的位置,其实大多数的配置文件都可以在这里进行配置,也可以在配置文件里面进行配置-->
        <property name="configLocation" value="mybatis-config.xml"/>
        <!--指定mapper文件的位置-->
        <property name="mapperLocations" value="mapper/*.xml"/>
        <property name="dataSource" ref="dataSource"/>
    </bean>

	<!--只传入一个sqlSessionFactory-->
    <bean id="studentMapper2" class="com.fsl.dao.StudentMapperImpl2">
        <property name="sqlSessionFactory" ref="sqlSessionFactory"/>
    </bean>
</beans>
测试代码
@Test
public void SqlSessionSupportTest(){
    ApplicationContext context = new ClassPathXmlApplicationContext("beans.xml");
    StudentMapper studentMapper = context.getBean("studentMapper2", StudentMapper.class);
    for (Student student : studentMapper.getAllStudent()) {
        System.out.println(student);
    }
}
总结
其实可以看到,两次的测试代码都没什么变化,几乎将所有的对象的创建工作都交给了Spring,我们只需要去
事务相关
数据库支持事务是必须的,下面使用aop的方式进行事务的配置
依赖
xml约束
<beans xmlns="http://www.springframework.org/schema/beans"
       xmlns:xsi="http://www.w3.org/2001/XMLSchema-instance"
       xmlns:context="http://www.springframework.org/schema/context"
       xmlns:tx="http://www.springframework.org/schema/tx"
       xmlns:aop="http://www.springframework.org/schema/aop"
       xsi:schemaLocation="http://www.springframework.org/schema/beans
       http://www.springframework.org/schema/beans/spring-beans-3.0.xsd
       http://www.springframework.org/schema/tx
       https://www.springframework.org/schema/tx/spring-tx.xsd
       http://www.springframework.org/schema/context
       https://www.springframework.org/schema/context/spring-context.xsd
       http://www.springframework.org/schema/aop
       https://www.springframework.org/schema/aop/spring-aop.xsd">
配置事务Advice
<!--配置事务通知-->
<tx:advice id="txAdvice" transaction-manager="transactionManager">
    <tx:attributes>
        <!--配置哪些方法使用什么样的事务,配置事务的传播特性  这里的*代表所有方法-->
        <tx:method name="*" propagation="REQUIRED"/>
    </tx:attributes>
</tx:advice>事务的传播特性一般就是使用默认的REQUIRED,相关的特性可以在网上查找相关的博客
配置哪些方法支持事务
    <aop:config>
        <aop:pointcut id="studentPointcut" expression="execution(* com.fsl.*.*.*(..))"/>
        <aop:advisor pointcut-ref="studentPointcut" advice-ref="txAdvice"/>
</aop:config>这里就是传统的aop的配置方法,这样配置,一个方法就是一个事务,具有原子性
记住,它会在每个方法开启一个事务,在方法的结尾关闭事务